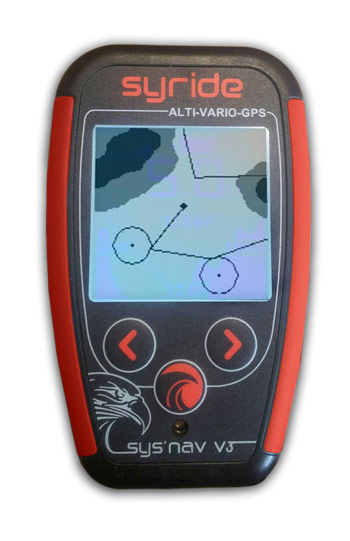
The Syride SYS'NAV V3 is a lightweight flight instrument packed with features.
This growing resource collects tips and tricks to help you get the most out of your instrument.
Getting started with the SYS'Nav V3
Read the manual, easy to find on the Syride website.

If you followed the steps in the manual, you'll now have SYS'PC Tool active on your PC. Open it up, connect your instrument and switch it on.
Change your parameters
Option > Setup > Instrument > Change Parameters.
Enter your pilot name
Option > Setup > Software. Enter your name in the "First and last name" field exactly as they are in the UKPGXCL. For example, if your First Name is "Darth" and your Last Name is "Vader" then enter "Darth Vader".

Load an airspace file
Find your airspace file on the Syride website and download it to your PC. Then run the SYS PC Tool Navigation > Airspaces > Send OpenAir file. You need to check the website regularly to ensure you have the latest airspace file.
Customise your screens
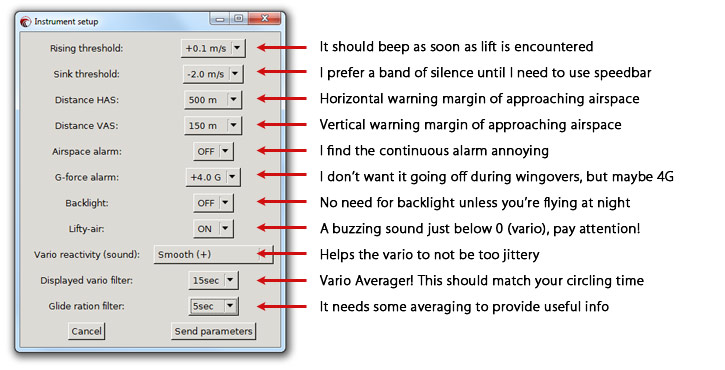
I don't find the standard screens useful. 'Option > Setup > Instrument > Set up my screen' will take you to the SSC Tool. Your flying environment is probably unique, some pilots have no significant airspace, some fly tasks, some like big digits. Adapt it to suit your needs. My advice is to keep it simple: Heading and speed; altitude and height above ground; average vario; windspeed and direction. That's what I need most, and it all fits on the first screen.
Here's an example of what I like to use:
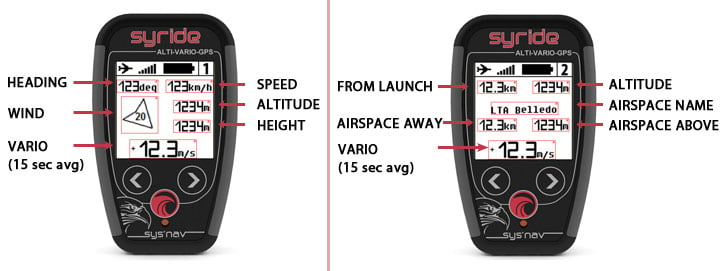
The instrument will warn me when I stray too near airspace, which will prompt me to check out the second screen. This displays the details of the nearest airspace. I keep my vario averager at the bottom so I don't lose that vital info when I'm circling close to airspace and watching the numbers. I also keep track of how far I've flown away from launch (top left).
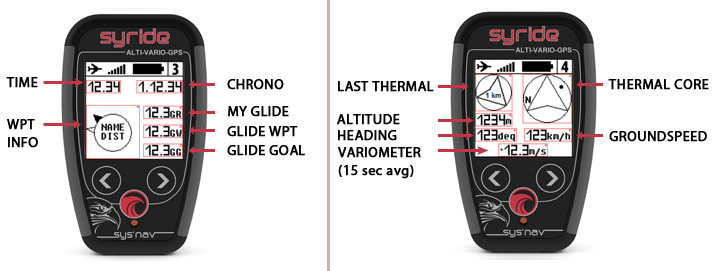
I use my third screen for navigating to waypoints in a task, and track the time of day and flight duration here. If you don't have a route loaded, this screen is redundant. On the final fourth screen, I experiment with new items in my 'alternative thermaling screen' that shows where the last thermal was, and where the core of the current thermal is.
Move things around until they display with maximum clarity, then upload them directly to the device. I'd recommend downloading a copy of the file as well.
Download topography?
This isn't necessary for V3 owners (the world topography is already preloaded!) The map screen (and height above ground) will work all by themselves. Only if you have the original Sys'Nav, do you need to go Topography > Download a topography.
Downloading flights
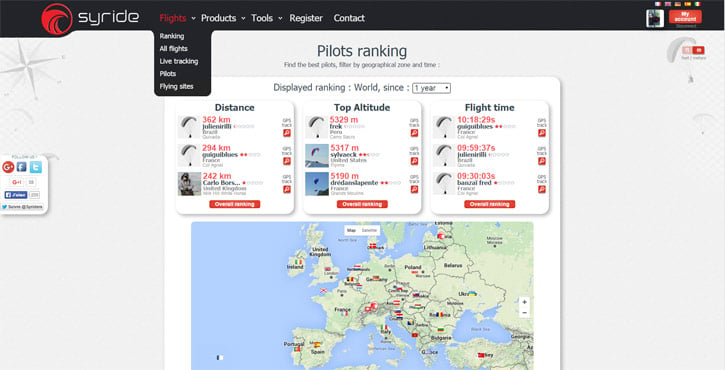
This is really easy. Next time you come back from the hill, plug your Syride instrument into your computer, switch it on, and the SYS PC tool should automatically start. Click the big green download button (the arrow on the world) and it will upload your flights to Syride's website at the same time as it copies track files to My Documents/Syride. It opens the web browser so you can take a look at your flights with a nice interface that includes a filtered Pilots ranking. It's a great system!
Optimizing battery life on the SYS'Nav V3
The largest power consumer on the SYS'Nav is the backlight. The backlight is not needed in regular flying conditions and is only useful indoors, when the light is quite low. That's why we suggest you turn the backlight off unless you really need it.
The GPS chip is the second largest power consumer in the instrument. Since the last SYS'Nav update (V3.35), it is possible in the settings menu of the instrument to activate the Power Save Mode (PSM) of the GPS receiver. Under optimal conditions, activating the PSM mode saves about 60% of the GPS chip's consumption. However, this energy saving is paid for in performance and the signal can be slightly degraded depending on environmental conditions (topography, weather, humidity, etc.). This is why we recommend that you only use the PSM mode if you need it (long flight, trip, low battery...). Before activating the PSM mode, remember to deactivate the backlighting first, this remains the biggest energy saving on the SYS'Nav.
Finally, mentioning the batteries, an important point is to make sure not to store them empty for a long time. If you're not going to fly for a few months, we suggest you recharge them in the meantime.
Creating a task on the SYS'Nav V3
The Syride SYS'Nav V3 now offers C-Records! This is a few lines of data recorded in your tracklog that defines the task you are attempting. For XC hounds chasing points in xcleague.com this is great news, because it means you can score the multipliers for declared tasks just by setting up a task on your instrument. No need to SMS or email coordinates!
This functionality is usually only seen on top-end competition instruments, but the SYS'Nav continues to impress with its growing feature list.
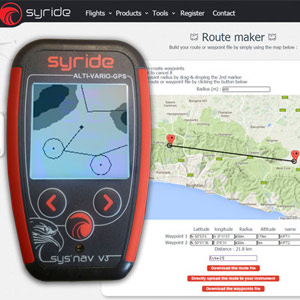
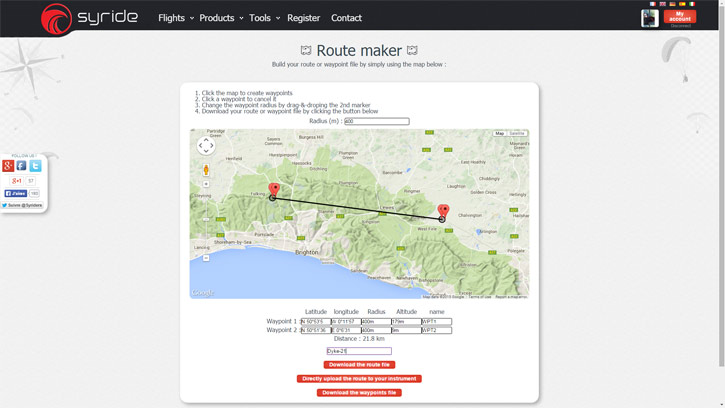
The best workflow for creating tasks on the SYS'Nav is using the Route Planner tool (rather than XCplanner), because the Route Planner includes the turnpoint radius and ensures the task name shows up within the SYS'Nav. It is also possible to create new turnpoints and tasks using the instrument alone, provided you know the GPS coordinates of your points.
Here's how to get a task loaded on the SYS'Nav V3:
1. Run the SYS'PC tool (it stays resident in the background on your PC)
2. Connect your SYS'Nav to your PC via USB cable, then switch it on. Wait for it to update firmware and show 'charging'.
3. Define your task on Route Planner. Simply click on the map to define points and name the task.
4. Click 'directly upload ... to instrument'.
5. On the hill, switch on the SYS'Nav. Right arrow to 'Navigation' menu, Power button to select.
6. Select 'Load route', right arrow through the available tasks, select your one.
7. Don't switch off. Fly!
Your task declaration is now recorded automatically in your tracklog file, in the C record.
The task you activate just prior to launching will be the definitive declaration in your IGC file. If you decide to abandon your original task and activate a new task while flying, the C record will be unchanged, so it is impossible to cheat by changing your declaration 'on the fly'.
If you switch your SYS'Nav off, the active task is lost. You must reactivate it.
Find out more about the Syride SYS'Nav V3.
SYS'Nav V3: Last Saved Position
The Last Saved Position (LSP) screen (on SYS'GPS V3 screen #3; on SYS'Nav V3 screen #6) works in a similar way to the Man Overboard (MOB) function which exists on many Marine GPS units. As with other GPS functions, your Syride instrument needs to have a valid GPS signal for this to work, otherwise it will just show "NO GPS".
When you first come to the screen, press the middle button to save your current GPS position.
The instrument will now take you to a new screen displaying:
1. Height gain or loss relative to the the last saved position in metres.
2. Distance from the last saved position in km.
3. The geographic latitude and longitude coordinates of the last saved position in degrees.
4. Compass heading and bearing. The cardinal letters (N, NW, W, etc) shows the direction you are currently heading in (heading). The arrow above the cardinal letters shows the direction of the saved position relative to you (bearing). When the arrow is in the middle of the screen you are flying towards the saved position. Arrow on the right = turn right. Arrow on the left = turn left. Arrow in the middle = go straight.
Press the middle button again to update to your current position, whilst on this screen.
Tip: This screen could be used as a goto takeoff function, by saving your takeoff position. Especially useful for powered flyers wanting to return to launch field after a cross-country flight!

SYS'Nav V3: FAQ
Answers to Frequently Asked Questions (FAQs) for the Syride SYS'Nav V3, some of which are also relevant for the SYS'GPS V3 and SYS'Alti V3.
Does the SYS'Nav V3 use GPS or barometric altitude?
The Syride SYS'Nav V3 has both GPS and barometric sensors, and uses both GPS and barometric altitude, the same as the SYS'GPS V3.
Is it possible to set the actual pressure settings i.e. QNH, QFE, QNE on the SYS'Nav V3?
Syride have chosen not to make it possible to manually set the actual pressure settings since a key concept of their range is to offer the most important features which the majority of paraglider pilots want, whilst keeping usability as simple as possible. Regarding how to deal with QNH, QFE, QNE with the SYS'Nav V3 (or SYS'GPS V3), see below:
QNH: The SYS'Nav V3 has a clever yet simple way of effectively setting this for you automatically: When you turn it the instrument on it will only use GPS altitude to begin with, until it gets a good GPS fix (8+ satellites). The GPS receiver gives 2 bits of information: the altitude, and the precision of this altitude. When the precision is sufficient (~ 5m) the instrument calibrates the barometric altitude according to the altitude Above Mean Sea Level (AMSL). From then on only the barometric altitude is used. This saves you having to enter the altitude AMSL manually each time before you fly.
QFE: Although you can't manually set QFE for any altitude, it is possible to display the "Height above take-off" which is QFE relative to take-off altitude. There's no need to manually set this before you launch since the SYS'Nav V3 does this automatically for you!
QNE: There isn't an option to set QNE or show Flight Levels on Syride instruments at the moment. So for Flight Levels you will need to manually calculate the difference between QNH and QNE.
How to prevent the hook hook-&-loop fastener damaging the risers?
When riser-mounting the SYS'Nav (or SYS'GPS or SYS'Alti), add a loop hook-and-loop fastener strip on the inside of each hook hook-and-loop fastener strip on the instrument to 'blank off' unnecessary hook hook-and-loop fastener. The SYS'Nav is so light and small that it really doesn't need all that hook-and-loop fastener to hold it on, and it has a securing loop to clip in to your carabiner anyway!
NB: For deck mounting, remove the extra 'blanking' loop hook-and-loop fastener strips so that the full length of the hook hook-and-loop fastener strips are exposed.
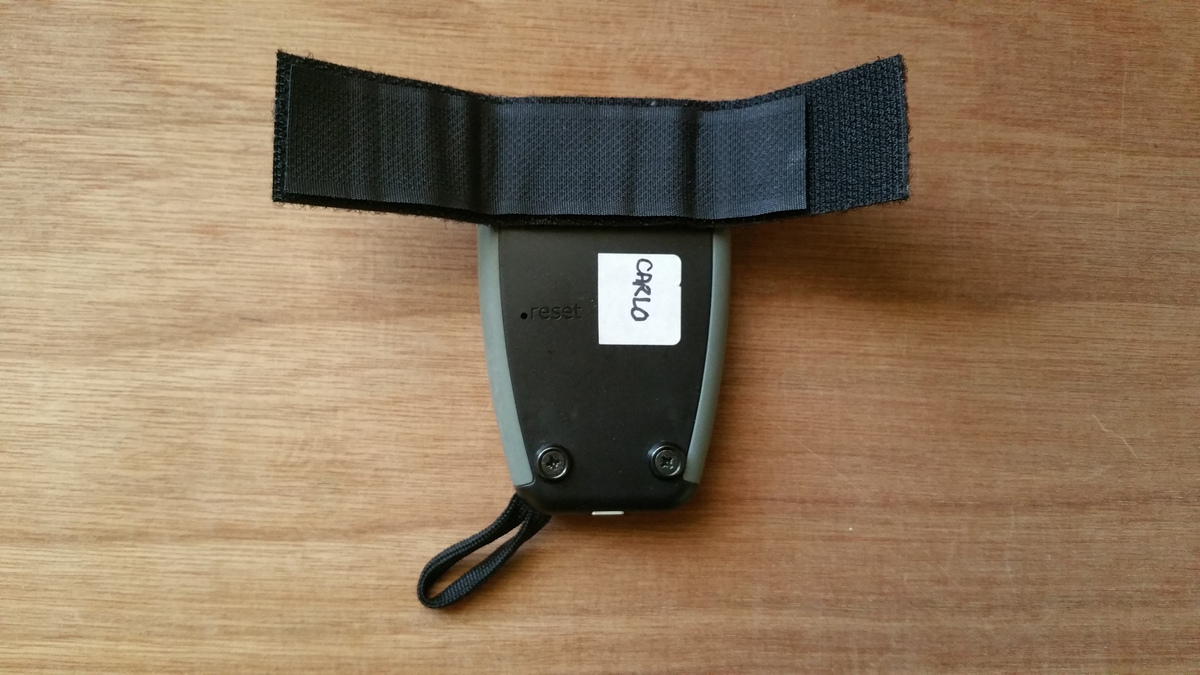
Can I make the SYS'Nav V3 even lighter?
Remove the bottom hook hook-and-loop fastener strip on the instrument by undoing the two bottom screws on the back, remove the hook-and-loop fastener, and then replace the screws. The SYS'Nav V3 is so light and small that it really doesn't need both hook-and-loop fastener strips to hold it on!
NB: Use the securing loop on the SYS'Nav V3 to attach it on to your carabiner or flight deck.
How can I mount the SYS'Nav V3 even quicker?
To make mounting the SYS'Nav (or SYS'GPS or SYS'Alti) even quicker and easier, add an extra loop of line (or camera lanyard), just long enough to pass the instrument through, on to the included securing loop. This way, for riser mounting, you can more quickly loop it to your karabiner and attach it to the riser, on whichever side you prefer, without having to detach and replace the riser. In a similar way, this speeds up flight deck mounting too.