The brakes offer a direct link to the paraglider. How you hold them affects your power, control and safety. In this article we discuss some options for your brake grab and demonstrate the best technique.
Holding the handle
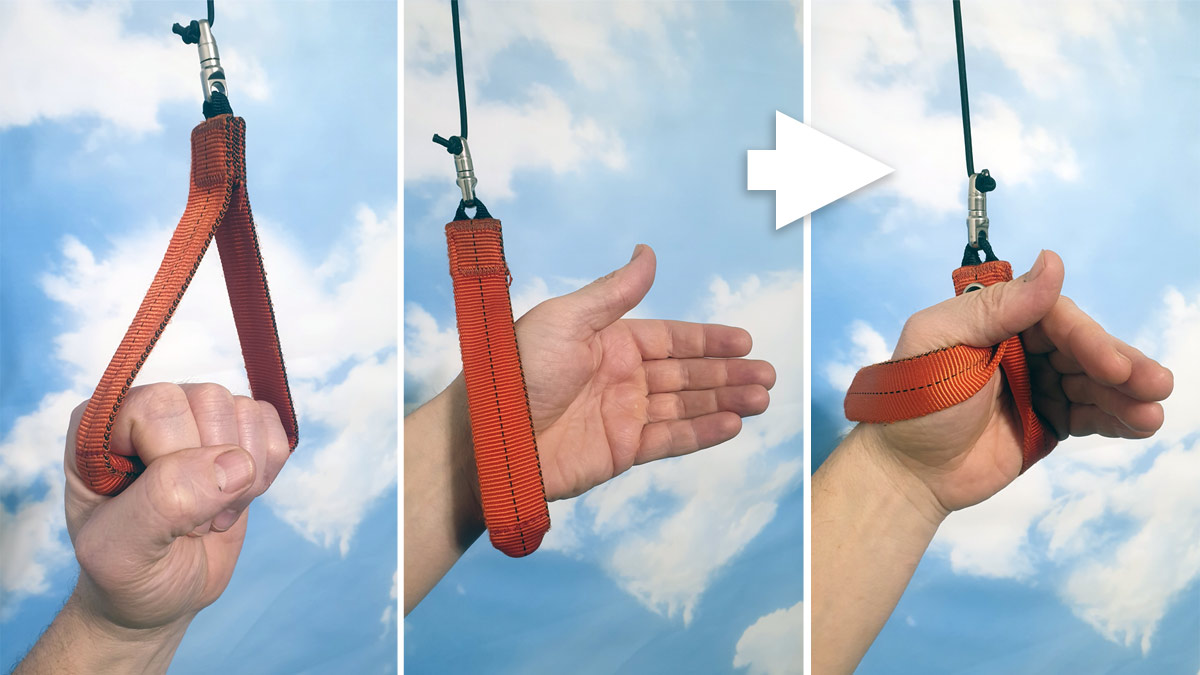
This is probably how you were taught to fly (the first image, above left). You simply grab hold of the base of the brake loop, and keep your fist tight. It’s also called the 'tourist position' or the ‘student position’. This ensures that you have the maximum travel on the brake lines, to prevent you from stalling the wing, spinning it during a turn, or inadvertently keeping tension on the trailing edge while gliding (bad).
There’s nothing wrong with this technique and it’s useful when soaring, flying paramotors, tandems, and any wing with a short brake setting. But once you gain a little experience and want to start thermaling, it’s not the best way to hold the brakes all the time, because it is tiring to turn like this as your hand ends up very low if you’re turning tightly. The brake pressure is also difficult to control because your arm is not in its strongest position in a tight turn. Most pilots shift to another grip to improve control and reduce fatigue. When your hand is higher than your chest, the movement is pulling rather than pushing down, which gives you a mechanical advantage.
Hands through the loops
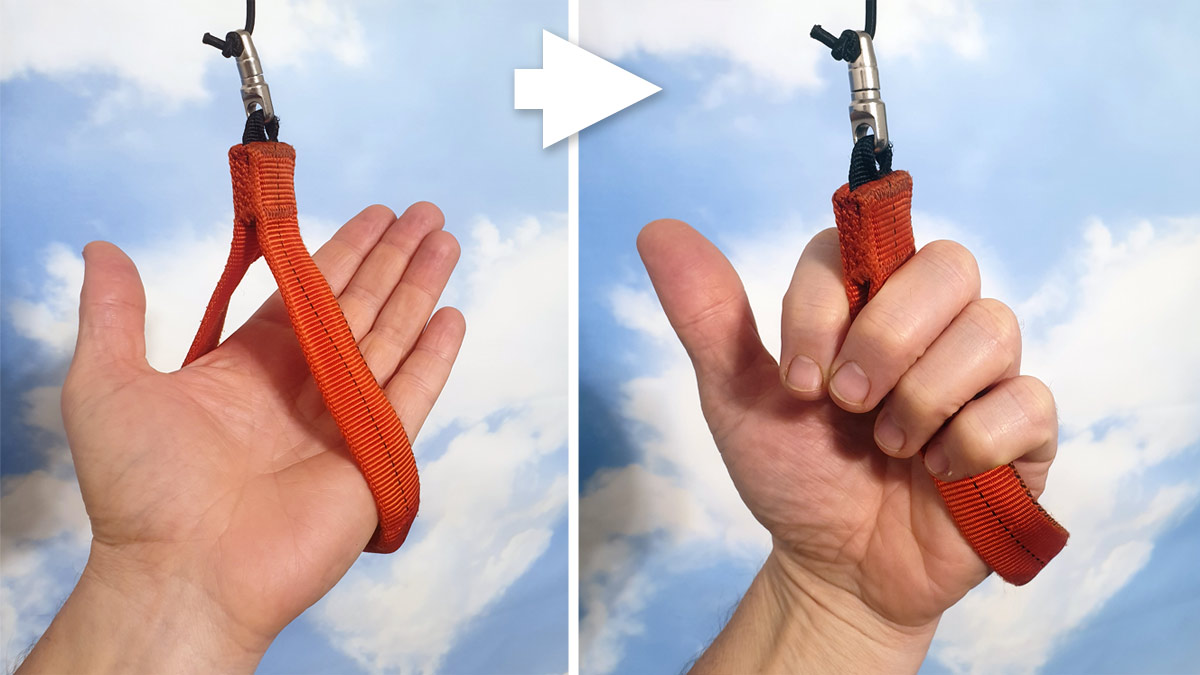
By slipping your whole hand through the brake loop (second and third images, above) before rotating the hand to grab the brake around the line so the top of the brake handle becomes wedged into the webbing of your thumb, you can achieve a higher brake position which reduces hand strain because a lot of the force is taken up on the back of the hand. Many pilots fly this way.
You retain a firm control on the brakes by pinching the webbing of your thumb closed, which leaves your fingers free to do other things. It’s very good during ground handling and wild moments, because it’s hard to lose the brakes – just pull your arms back at any time and the brake loops will catch on your wrists. However, it can result in a small amount of brake always being engaged if you have short brake settings, and this can interfere with ground handling.
There’s some unnecessary hysteria about this technique by the critics. The danger cited is that you can’t get your hand out of the loop during flight. To release, turn your palm towards your face. With this angle your hand should always slip out of the brake, unless you’ve got tiny brake loops and massive winter gloves, in which case I would advise using another brake grab in the first place.
There’s only one moment when I’d want to 'let go' of the controls: locked brake lines.
During reserve deployment, you should retain pitch control on your wing. You can keep contact with the brakes by reaching through the loop to grab your reserve handle, or you can put the brakes into one hand (in front of your face) and use your free hand for the deployment.
But if the wing has twisted up and the brakes are locked, or the brake has knotted in place because of poor preflight checking, you might panic when you can’t move your hand directly down to the reserve handle. With a bit of practice you’ll find it simple to extract your hand, but if want to be sure, consider a new brake grab.

Cobra grip
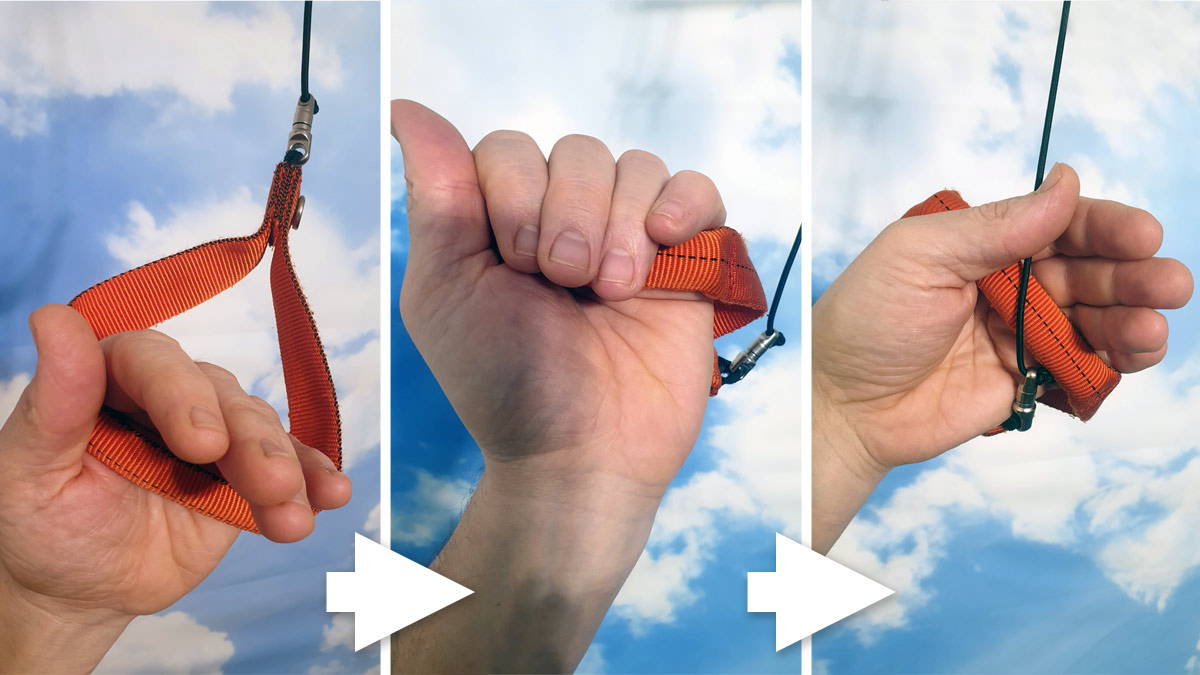
(Pictured above) This works well with brake balls (see below), or on its own. With your palm facing upwards, thrust four fingers into the brake (leaving the thumb outside), then ‘strike’ your fingertips towards your face so the brake line now goes between first and second finger. If you have a ball or acro handles, grab over that. To release the grip it’s best to rotate your hand so your palm is facing you (as pictured).
Brake balls/acro handles
Acro handles or brake balls are attached to the top of the brake handle to give you something to grip hold of for added contact with the wing. It stops the slightly spongy feeling of the brake handle fabric acting as a shock absorber, so you get hard-sprung contact which some pilots like. However, your hands can fatigue from gripping the ball over a long period on a stiff glider.

Half wrap
This is explained well in Kelly’s Farina’s Mastering Paragliding book (useful reading for progressing pilots). From the first position (holding the base of the handle), move your hand in a circle towards your centre line, upwards then outwards, to collect a ‘half wrap’ of brake line (it’s demonstrated in the video below).
This gives you an optimal position for thermaling, with great control. It’s also very easy to release the brake altogether. The line rests on the handle stiffener, so it doesn’t cut into your hand. You can also pinch the line between thumb and forefinger to get delicate feedback from the wing. Overall this seems to be a good solution for comfort, control and safety during thermaling.
However, be careful that you have long enough brake lines to accommodate this (it's not suitable on every glider). Also remember this will change the height of your stall point and your spin point, so be aware of this during your turns and landing approaches.
Full wrap
This is the 'old school' technique and is not recommended: 'hands through the loops' grip, then a wrap of line is taken around the outside of the hand. In the old days brakes were sometimes made way too long, or the wings had very long travel and unresponsive controls, so it was necessary to shorten the brakes a lot to get tight thermaling turns. However, this technique is bad, the line cuts off the circulation and 'ties' the hands into the brake loops which makes a fast release problematic, and the full wrap shortens the lines too much so you run the risk of stalling or spinning the wing because of the large change in brake position.
Carlo's brake grab
"I don't have one favoured technique for holding the controls, I change the way I hold the controls depending on various factors e.g. which glider I'm flying, wing brake length/travel/pressure, what kind of flying I'm doing, the flying conditions, the thermal, and I purposefully change my the way I am holding the brakes to avoid fatigue on longer flights.
I probably most often fly with my hands through the loops. Next, a half wrap or I just hold the toggle around the outside, near the top. When I want to relax and I don't need to steer the wing much I fly in the 'tourist position' just holding the bottom of the brakes. I also hold them like this when flying accelerated and using the rear risers."
Play, experiment, find out what works best for you.
Brake grab video
We explain some options for grabbing your brakes
Brought to you by Flybubble
Like what we do? The best way to thank and support us is to buy gear from us and recommend us to others. Review our service on Trustpilot and our products on Flybubble Shop. You can also subscribe to Flybubble Patreon. Thank you!

