Steve Uzochukwu reports (review courtesy of SkyWings Magazine.
Their Oudie 3 flight computer, flight planning and analysis tool for sailplane, paraglider and hang glider pilots runs on Windows as well as Android, iPhone and iPad devices. Naviter has been making the more sailplane-orientated Oudie for a while, but now in the Oudie 3 there is a dedicated free-flight instrument. The UK importer is Flybubble Paragliding.
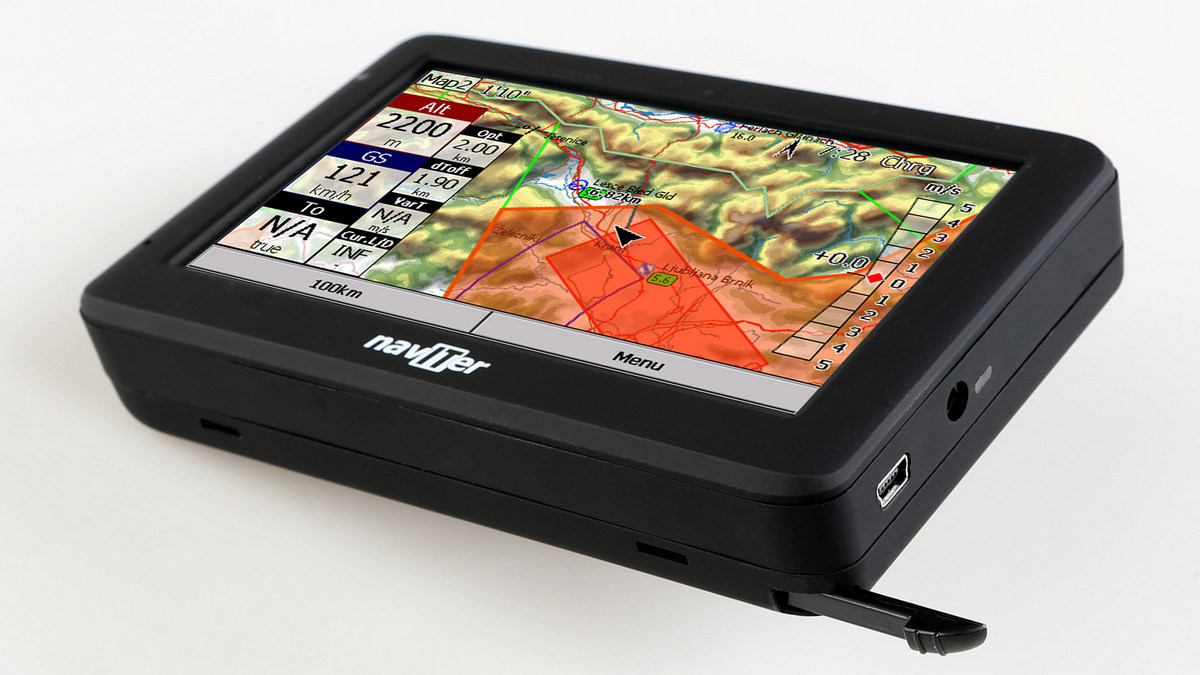
The Oudie 3 is a very sophisticated all-in-one instrument and almost infinitely configurable. Naviter makes the bold claim that it can be used straight out of the box. Andrej Kolar, their main man, had the first production examples at the 2013 St Hilaire festival. I was allowed to try the display in bright sunlight and judge its readability, and to take a quick look at the instrument in general. It runs on Windows Mobile.
An all-in-one device attempts to cover all the roles we need in flight instrumentation: vario, altimeter, GPS, competition flight computer and movingmap display, with airspace and all the turnpoints for competitions. The Oudie 3 has no dedicated physical controls other than an On/Off button and relies on a touch screen for control. You can use a stylus on the screen for set-up on the ground.
The box contains the instrument, a carry case, a fast mains charger, a USB lead to connect to a PC and a car charger which uses the USB port. The mains charger has a selection of four plugs and will work from 110 up to 240V. Wherever you are in the world, you won’t be searching for adaptors to charge your Oudie 3.
The Oudie 3 comes with a printed quick-start manual to get you up and running, but for a full works, in-depth manual you’ll need to go to www.naviter.com where the device has its own dedicated website. Here you can download the updater which will check, when you plug it into an internet-connected PC, that your unit has the latest software version.
The first thing I tried to do was what it says on the box - take it out and try it without having to do anything to it. I went to a site, powered it up and flew. The QNH altitude box was within three feet of the correct altitude, so I spent a day flying with it without my usual vario. The only adjustment I made was to make the audio volume louder.
If you need to set the altitude it’s in the menu at the first level. I flew with the first map page set to a smaller magnification, the second to a larger one. After my first 360 the Oudie 3 would flip over to the Thermal Assistant screen. A great result for the first outing - no great need for a manualreading session - but the success of the day was improved by a ten-minute briefing from Carlo at Flybubble. Box ticked!
The next hurdle was the process of updating program software, maps and airspace overlays. This is an area where I could run an evening’s course on other instrument combinations, or on units modified for free flight from other uses. Naviter’s claim is that the Oudie updater can be downloaded, installed on a PC and left running in the system tray. As soon as the instrument is plugged in the program will offer you updates and install them for you. The unit I was supplied with was one step behind on the latest program software so I could test this.
I downloaded the updater. I ran it. It sat in the system tray, and when I plugged in the Oudie 3 it offered me a program software update. I clicked the download button, and when it was finished it offered me the option of installing, which I agreed to. All I had to do whenthe install was complete was to reboot the Oudie 3. After a software update it asks you to confirm the update by agreeing on the touch screen, but answering yes or no is the hardest thing you’ll be asked to do. So for updating maps, program software and, more importantly, airspace, there is no hurdle - it’s dead simple. A Mac version of the software is in progress now, but there’s already an easy way to copy the necessary files from a Mac onto the Oudie 3 to run any required updates.
Having established that the Oudie 3 would run out of the box, and that updating it was the easiest thing in the world, I was free to remove the metaphorical cable ties from my hands and start to change things to exactly how I wanted them. Firstly, it’s a testament as to how good the out-of-the-box set-up is that I was really only going to fettle things, not to change wholesale the way the instrument is set up from default.
For those worried about spoiling or making a mess of it, there are two get-out-of-jail cards. The first is that you have to save changes to the settings for them to appear on the screen after you exit the program. Any major episode of finger trouble can be ended by exiting, and choosing ‘no’ when asked to save the current settings. Should you then find that you’ve really made a pig’s ear of it, in Menu > Settings > Misc there is the option to restore the defaults. By contrast, once you have the screen how you want it, you need to head into Menu > Next > Save Settings to ensure that the exact look and arrangement of buttons, gauges and boxes is how you want it.
Looking at the arrangement and graphical presentation of everything on the screen, you are spoilt for choice beyond belief. The data fields with values in them, or Nav Boxes, as Naviter calls them, can have the overall size adjusted, and can have one, two or three lines of data in them. The first line is always the value. Then you can add the name of that value if you want to be reminded. The last thing you can add is the units that value is in, feet, metres, degrees, km, or whatever. When you have got the box how you want it, you can then decide how transparent it is going to be, and it will do anything from totally see-through to completely opaque.
When you’re happy with that you then set the position of the box on the screen by simply dragging it. When the boxes are all correctly positioned you can lock the screen overall, or remove the ability of the boxes to be positioned. There’s a very large number of Nav Boxes to choose from; those on the screen by default are just a tiny fraction of what exists - you can have whatever information you desire.
Some Nav Boxes are for actions, like changing screens or turning the vario sound level up and down. These can go on one or both main screens, and can be varied in size and transparency. The layout, look and feel of the instrument can be 100% yours. I placed the vario volume control on one screen and the buttons for easy zooming in and out on both. All of this is possible on the hill and does not require access to a computer, you just need the stylus or your fingertip. Working through this process you realise just how powerful the Oudie 3 is and how numerous the options are. It then starts to become apparent that a fair proportion of the cost must be in the research and development of the SeeYou mobile software. Updates are free, and as already tested, very simple.
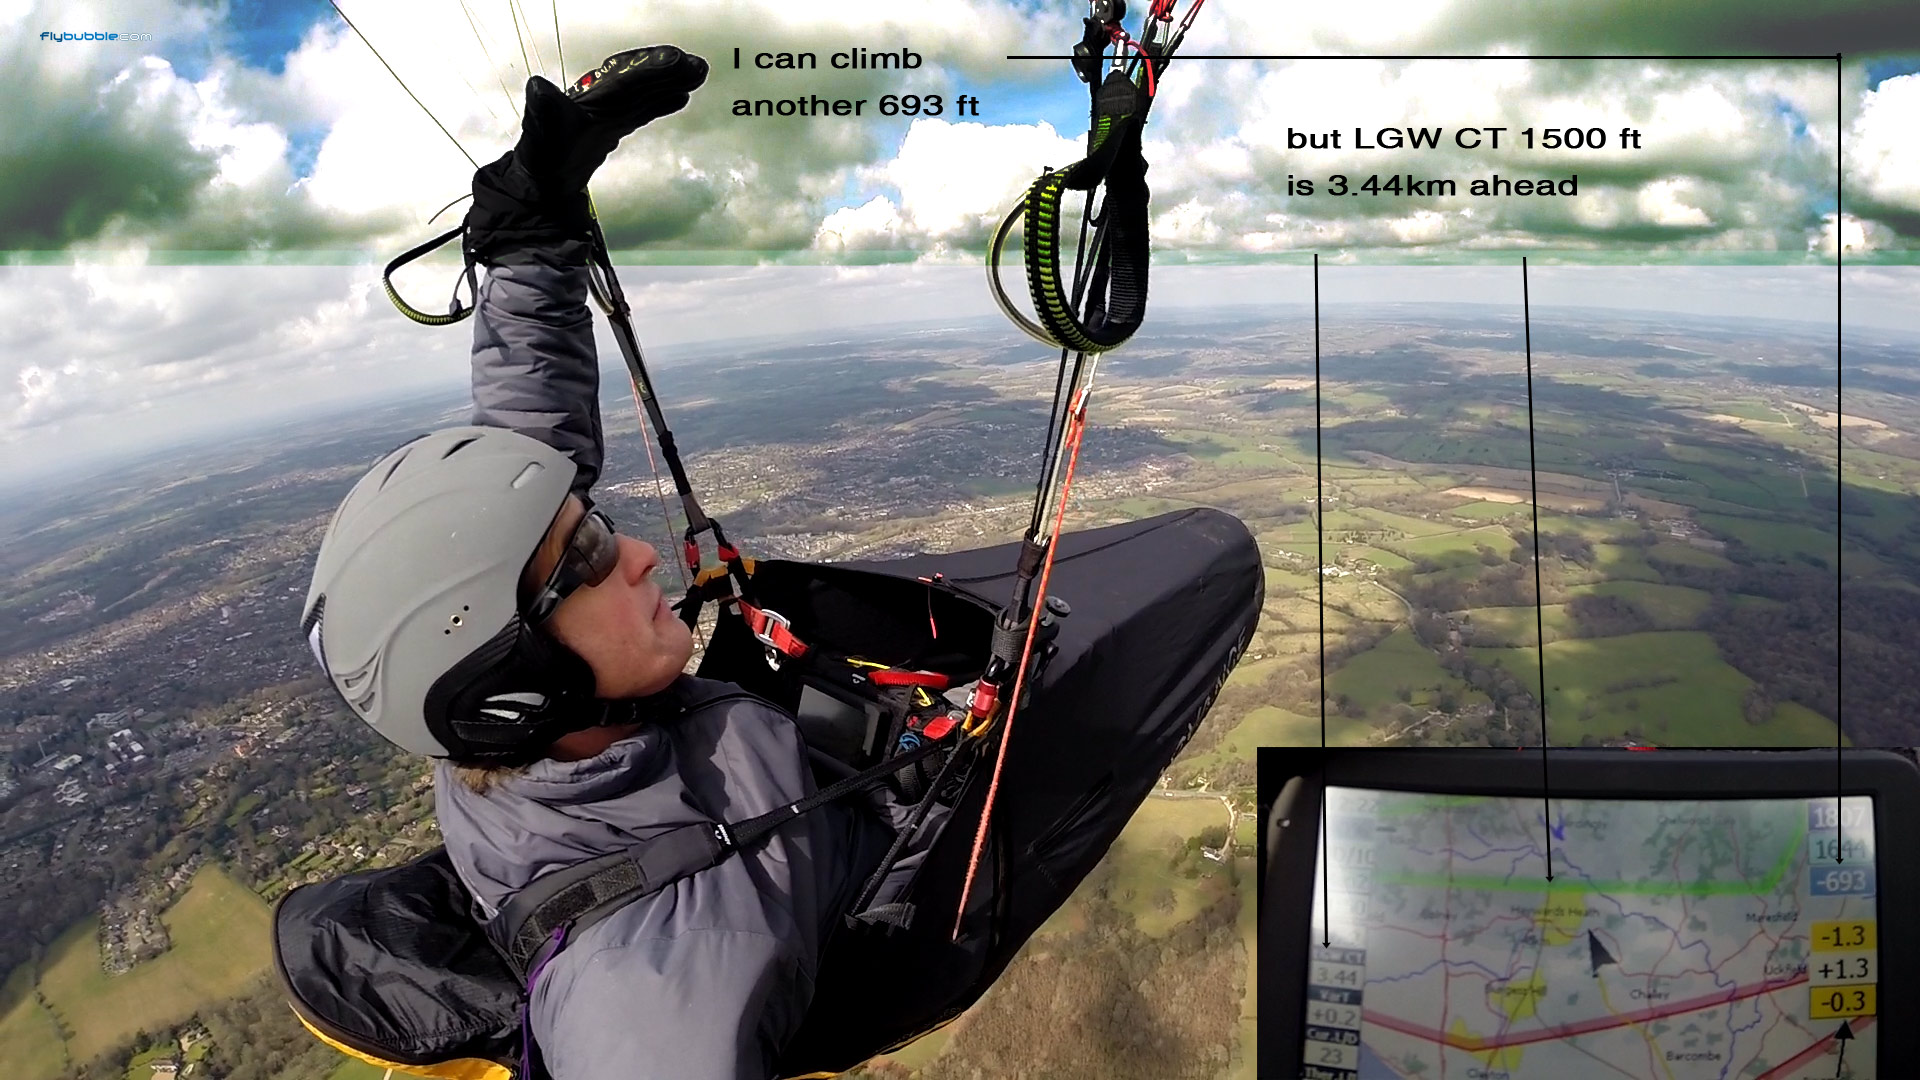
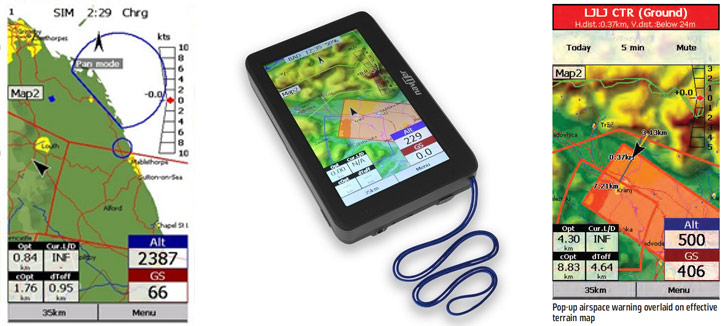
One of the main reasons for choosing the Oudie 3 in the UK is the convoluted nature of airspace, and the desire to have a simple and easy-to-read moving map display to see and avoid it. The Oudie 3 gives a very good display with airspace warnings at preset proximity. The warning is a pop-up, large enough on screen to grab your attention, or to be quickly dismissed with the quick prod of a gloved finger.
Airspace is already loaded but you can edit or change the files if you want. The stock files sometimes give erroneous warnings for non-ATZ airstrips; my own strip at Egerton in Kent, for example, comes up with a warning for Class D airspace which it is not. Having said that, the map is so clear that you are able to easily know where you are and to quickly cross-check with your standby paper chart to deal with any extra warnings.
I tested the airspace warnings in a microlight to see how they came up and it worked very well. As stock the Oudie 3 errs on the side of caution, and of course you would not want to wander through the overhead of a busy strip like Popham without being aware of it, despite the lack of Class D airspace there. There will soon be an alternative map that addresses this minor issue.
I experimented with both landscape and portrait settings. Portrait seemed to work best for me for paragliding if it’s in a pouch and not on a flight deck, and landscape best in a microlight fastened to the dashboard. I suspect that landscape might be a better option for the hang gliding version. You can refine your settings and visualise the effect by playing back files of your previous flights.
Having enjoyed general flying with the Oudie 3 and having customised it to my taste, I was then able to fly a small XC from a site on the South Downs close to the sea, heading inland on the sea-breeze front. This allowed me to test it in anger in the intended XC environment. I hadn’t changed much from standard settings, but I had removed a number of the competition-based data fields and replaced them with things I prefer. I’d also changed the vario volume and the sinkwarning threshold.
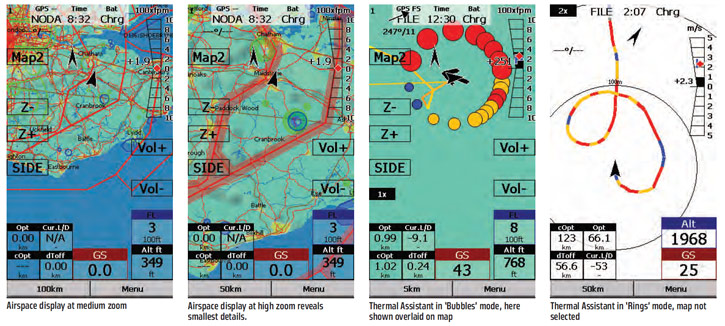
The vario is very sensitive and has no delay, so whilst the Thermal Assistant is nice and can help when you’re struggling in weak conditions, the audio is so good that you can centre on that alone. Once or twice I looked at the Thermal Assistant when struggling in broken lift. The bubbles were very useful, and being able to see height information in exactly the place I wanted to with exactly the size of lettering I wanted was also fantastic. I was not lacking for anything and only touched the instrument twice in the whole flight, to adjust its angle on my chest strap and to change to the second map covering a larger area. If enabled, the Thermal Assistant cuts in with either a zoomed-in map with the track coloured to indicate lift/sink, or bubbles if that has been chosen in the relevant menu.
The ‘Rings’ setting gives you a coloured trace on your thermal circling path, the colour depending on how good the climb is relative to your MacCready setting for next climb. With the bubbles alternative they are sized, getting bigger for stronger lift, coloured blue below MacCready value, orange close to it and red above that value. The arrow points to the best lift in the previous 360 and its length suggests how far you need to move in that direction.
With the default MacCready value of 0.0 m/s for both displays, blue is sink, orange is light lift and red is the real thing. This is an example of the real power of the Oudie 3: a stock setting that is correct for the new XC pilot, but the MacCready setting can be ratcheted up by the more experienced so the blue means ‘don’t bother - move on’, orange means ‘investigate’ and red means ‘take this climb’.
I didn’t get a chance to try the competition turnpoints and other things like the conical ESS (End of Speed Section). The Oudie is already set up to offer the current range of competition turnpoints. If you are flying into a conical ESS the side view will show you where you are vertically in relation to the end cone. Used in a recent PWC, it has been proven to support all the current waypoints and goals used.
The Oudie 3 is very accomplished instrument. It has nuances and sophistication that will satisfy top pilots, but it doesn’t demand that the owner be an accomplished techie. The instrument will work straight out of the box with moving maps and a vario that works very well without any intervention from the user. But it can then be customised to display exactly what the user desires. The possibilities grow as you become more familiar with the instrument. It can be altered to any layout you want, even to store different layouts for different tasks. You might, for instance, have two different profiles for competition and general XC flying. The initial outlay is not insignificant, but the Oudie 3 does provide a onestop solution. A very high quality instrument that does everything, and very well too.
LIFT:
- Works straight out of the box
- Sunlight-readable screen
- Any configuration you want
- Updating incredibly simple on a PC
- Good battery life and wide range of charging options
SINK:
- Will need to be stored in the supplied pouch and to have the touch screen looked after
- No Mac auto-update yet
- No charging indicator when plugged into charger
The Naviter Oudie 3 is available from dealers and from Naviter UK importer Flybubble.